Remove Date Stamp from Photo
Remove Date Stamp from Photo is a free AI tool that lets you remove the orange date stamp from old photos with AI. Upload a scan or a phone photo of a print and the date digits in the corner are erased and filled in to match the picture. No brushing or masking.
Free to try · first generation free on signup · no credit card
Start by uploading image
Upload your image
Click to browse or drag & drop
Configure your options
Related Tools
Your AI Design Will Appear Here
Fill in the options on the left, then press Generate.
Upload your image
Drag & drop your file here or click to browse
Take the orange date off your old photos
From the 1980s into the 2000s, many point-and-shoot film cameras and early digital cameras could print the date straight onto the picture: small orange or red digits such as '98 7 14 in the bottom right corner. It was handy for remembering when a photo was taken, but it sits on top of the picture for good, often right across a face, a cake or a sunset. This page removes those digits and rebuilds what was behind them, so the photo looks the way the moment did.
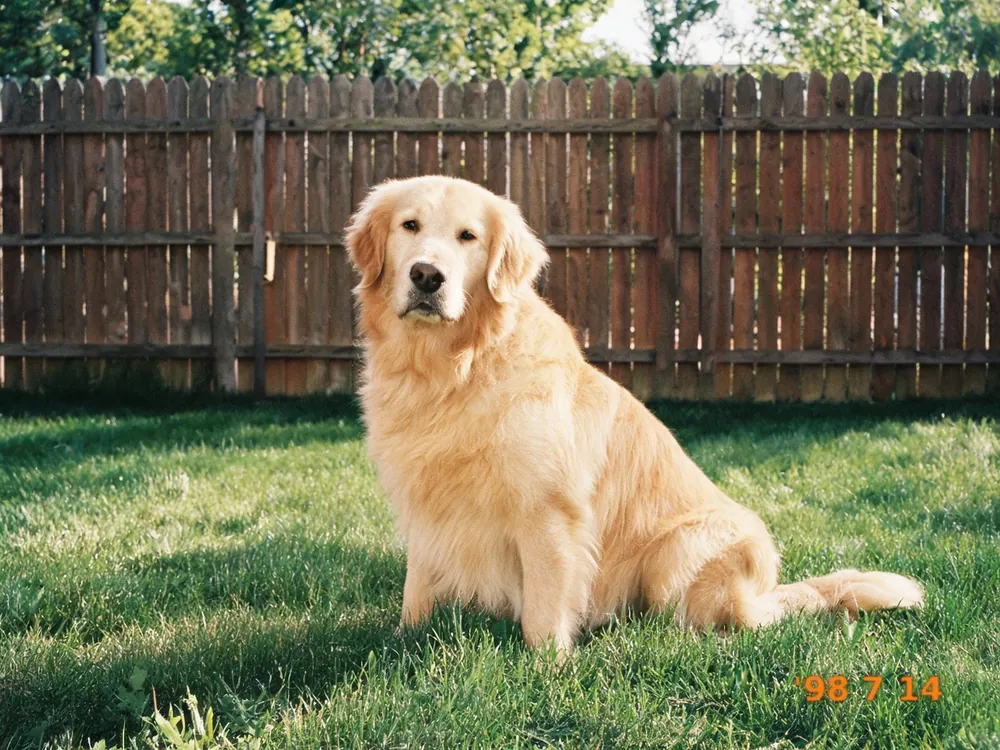
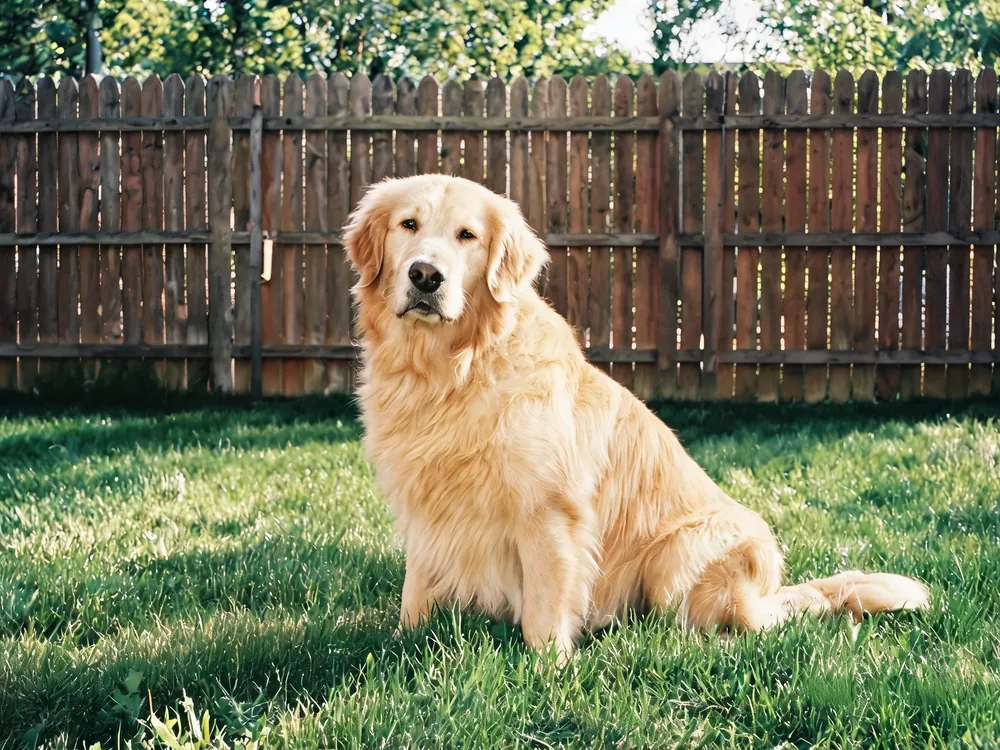
Settings: Stamp color "Orange", Position "Bottom right corner". The grass under the digits is rebuilt to match the lawn. The before photo is an AI-generated example with a stamp added, not a customer photo.
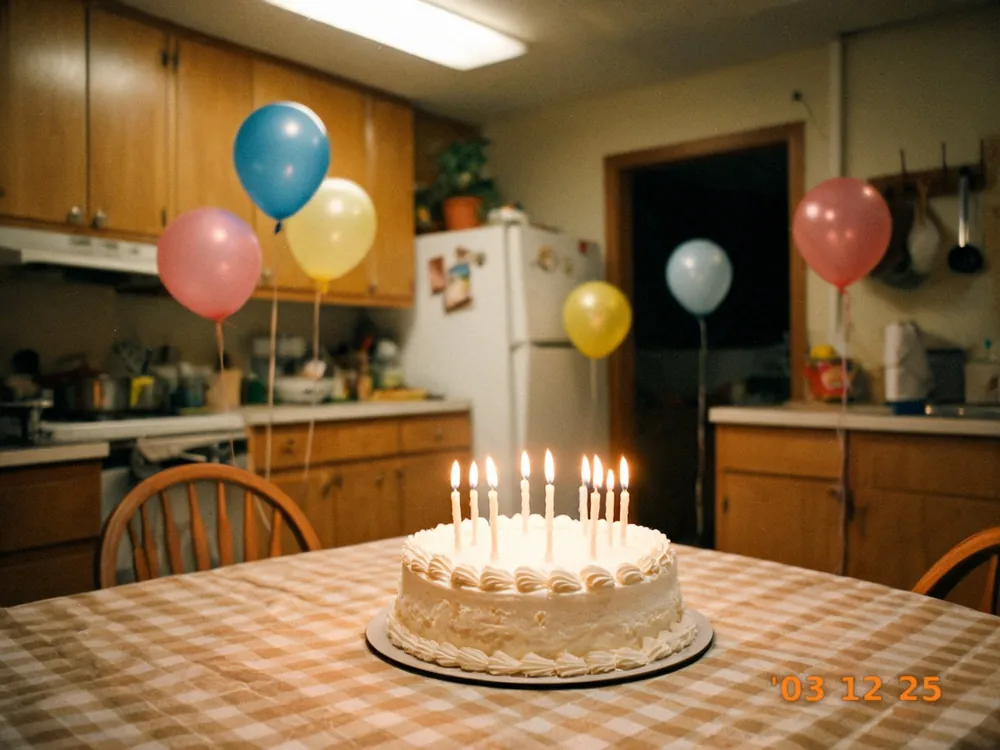
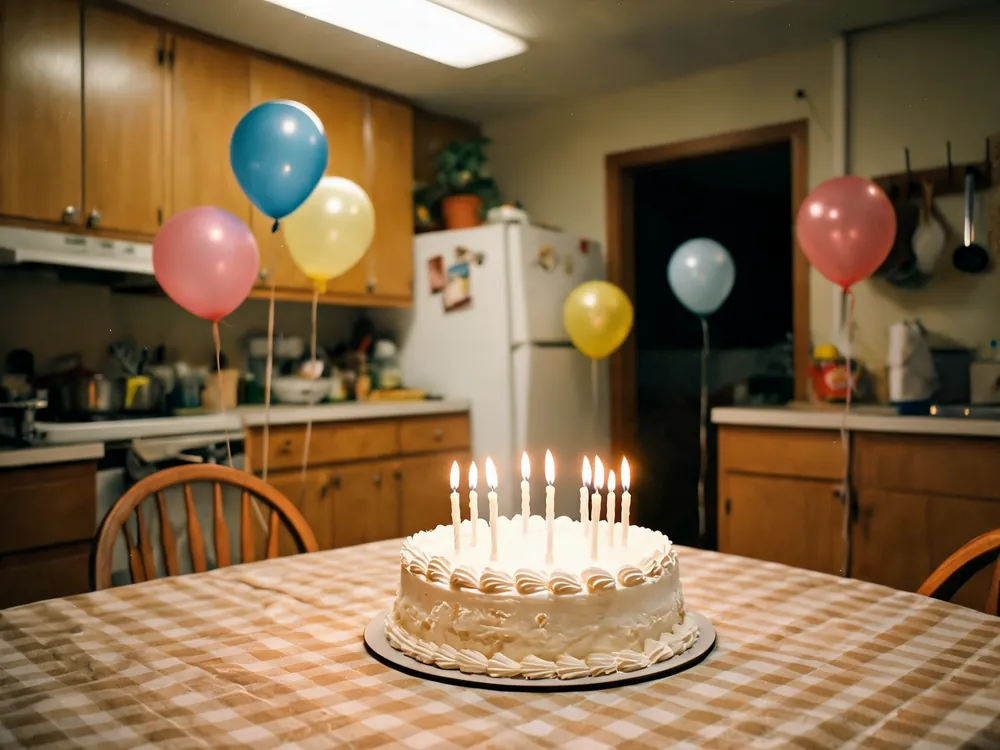
The checked tablecloth continues through the spot where the date was printed. Same default settings; AI-generated example photo.
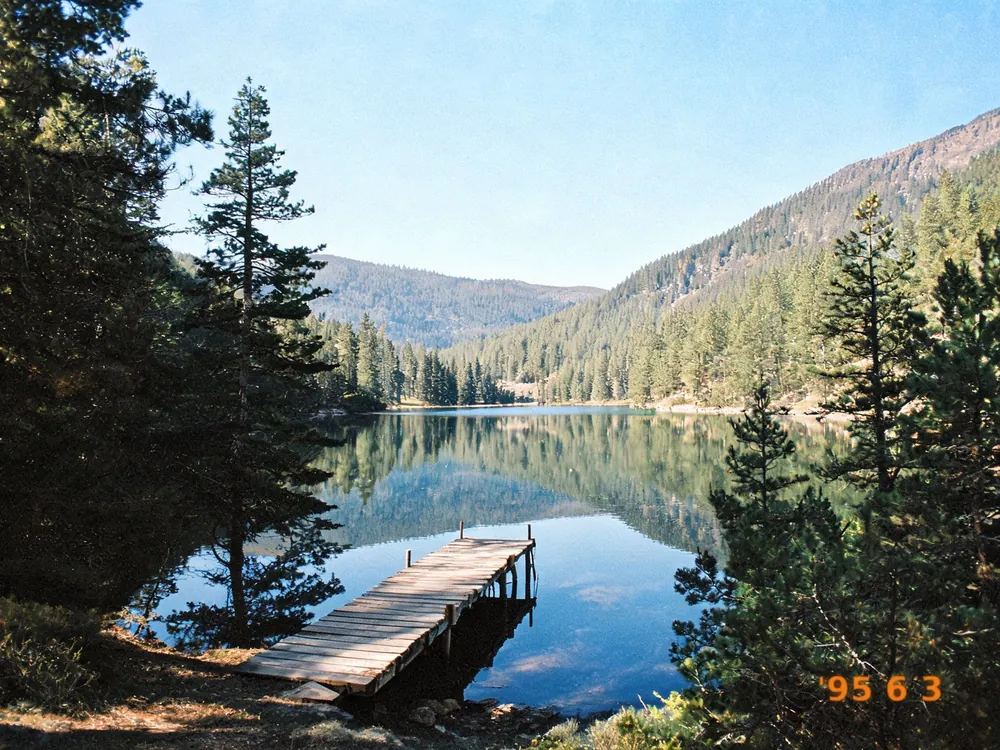
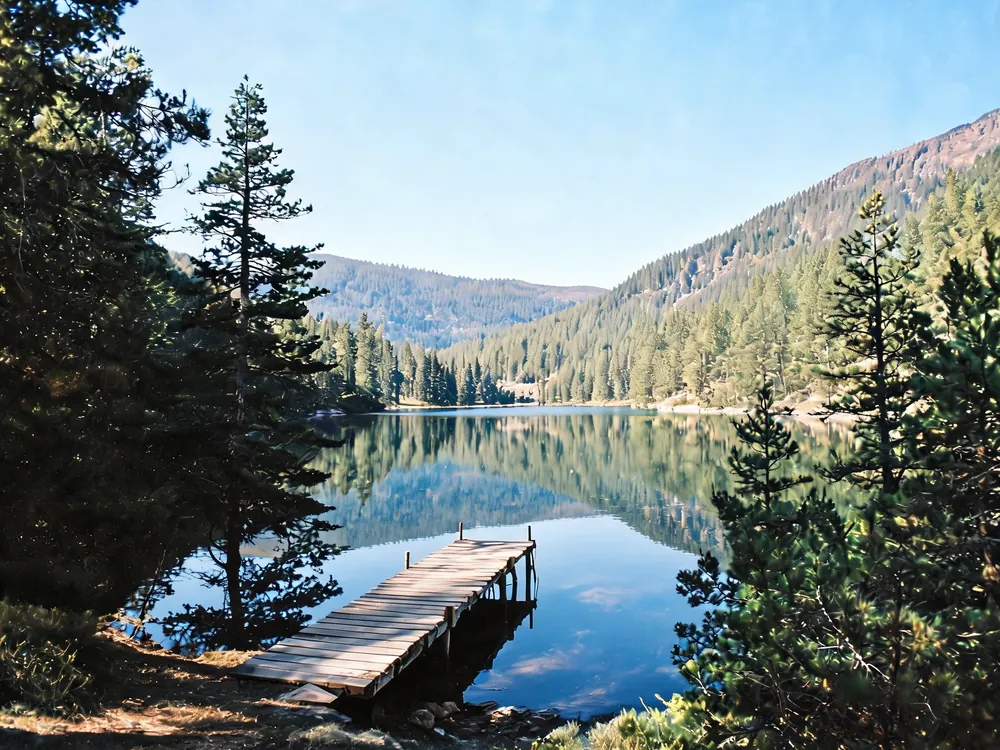
A dark, uneven background is the hardest case for a fill. Same default settings; AI-generated example photo.
Remove a date stamp in three steps
Upload the photo
Use a scan of the print if you have one; 600 dpi is plenty for a standard 4x6. A phone photo of the print works too: shoot straight down in soft daylight so there is no glare on the glossy paper, then crop to the edges of the print.
Tell it what the stamp looks like
Pick the stamp color (orange is by far the most common) and the corner it sits in. If the camera printed the time as well, leave it as is: the prompt removes the date and time digits together.
Check the corner and save
Zoom into the corner where the date was and compare it with your original. If a faint ghost of a digit is left, run it again, or add a note such as "the stamp is over the sky" to point the model at it.
Where date stamps come from
The date was not added later. It was exposed onto the film or written into the image file at the moment you pressed the shutter, so it is part of the picture itself, and simply cropping it off usually cuts into the photo.
Film cameras with a data back
Compact 35mm cameras had a tiny light inside the back door that exposed the digits onto the film from behind. That is why the numbers glow orange or red and look slightly soft: they were printed onto the negative with light, not ink.
Early digital cameras and phones
Many early digital cameras had a "date imprint" setting that burned the date into the JPEG itself. Unlike the date in the file information, it cannot be switched off afterwards; the digits are part of the pixels.
Disposable and novelty cameras
Some disposable and retro cameras still print a date today as part of the film look. If you want the photo without it, the same fix applies.
Wrong dates
Data backs reset when the battery died, so many prints carry a date that was never right, such as a year of '88 on a photo from the 2000s. Removing the stamp avoids passing that wrong date down with the photo.
What makes a clean removal
The model has to invent the few square centimetres hidden under the digits, so it does best when the surrounding area gives it a clear pattern to continue.
Plain and natural backgrounds
Grass, sand, sky, water, walls and floors are the easy cases: the fill blends in and is hard to spot even when you zoom in.
Repeating patterns
Tablecloths, tiles, fences and paving usually continue correctly through the gap, as in the checked tablecloth example above. Check that the lines still meet up.
Stamps over people
When the date crosses a hand, a shoulder or clothing, the model has to redraw part of a person. Check those areas carefully and run it again if a finger or a fold looks wrong.
Scan quality matters more than the stamp
A blurry, glare-covered phone photo of a print gives the model little to work with. A sharp, flat, evenly lit scan gives it the most to work with and keeps the rest of the photo close to the original.
What to expect from an AI fill
It rebuilds the hidden spot
Nobody can recover what the camera never recorded under the digits. The model fills that spot with what most plausibly belongs there, which is right for grass or sky and usually right for patterns.
The whole image is redrawn
The model returns a new image rather than patching only the corner. In our tests the subject, framing and colors stayed the same, but fine textures can come back a little sharper, and the frame can shift by a few pixels.
Keep the original
Save the stamped original alongside the cleaned copy. The stamp is still a record of when the photo was taken (or when the camera thought it was).
Other damage is a separate job
This page only removes the stamp. For scratches, fading, tears or color casts on the same print, run it through a photo restoration tool afterwards.
Date stamp questions
How do I remove a date stamp from a photo?
Upload the photo, choose the stamp color and the corner it sits in, and press Generate. The AI removes the date digits and fills that spot with whatever should be behind them, such as grass, sand, a tablecloth or sky. You do not need to paint a mask over the numbers.
Will it change the rest of my photo?
The prompt tells the model to keep the composition, framing, colors, lighting and grain as they are, and in our tests nothing was added to or removed from the picture apart from the stamp. The model does redraw the whole image when it saves it, though, so fine textures such as fur, leaves or brickwork can come back slightly sharper or a touch more saturated, and the frame can shift by a few pixels. Keep your original file and compare the two side by side.
Does it work on scans of old prints?
Yes. A flatbed scan works best because it is evenly lit and sharp. A phone photo of a print also works if you shoot straight on, without glare, and crop away the table around the print first.
My stamp is red, yellow or white, not orange. Will it still work?
Yes. Pick the color that matches in the Stamp Color menu, or choose "Not sure" and the prompt simply asks for the printed date digits to be removed. Choosing the right color and corner helps the model find the stamp faster when the photo has other text or bright details.
Can it remove the time as well as the date?
Yes. Many cameras printed both, for example a date on one line and the time next to it. The prompt covers the printed date and time digits together. If the stamp is somewhere unusual, use the corner menu or describe it in the notes box.
Can I remove other text, logos or watermarks with this page?
This page is tuned for camera date stamps. For captions, signs, logos or watermarks, a general text or object remover is the better fit, because those need a different prompt.
Can I do a whole album at once?
Each render handles one photo. For an album, scan the prints first, then run the stamped ones one by one; it is worth checking each corner, since the background behind the date is different in every photo.
How do I stop my camera adding a date stamp?
On film cameras with a data back there is usually a small Mode or Date button near the date display; press it until the display shows dashes or turns off. On digital cameras and some phone camera apps, look for "Date imprint", "Date stamp" or "Timestamp" in the settings menu. Turning it off keeps the date in the file information without printing it on the picture.
How much does it cost?
You can try it without paying. Each render uses 2 credits; paid plans add more credits, remove watermarks from the output and unlock premium models.
Finish restoring the photo
Fix scratches, fading and color casts on the same print once the date is gone.
Bring color back to black and white family photos.
Remove a person, sign or other object from a photo.
For captions, signs and other text that is not a camera date stamp.