
How to use Cufflinks AI Model on AI Two
Show cufflinks on a photorealistic model with Cufflinks AI Model in Fashion Studio.
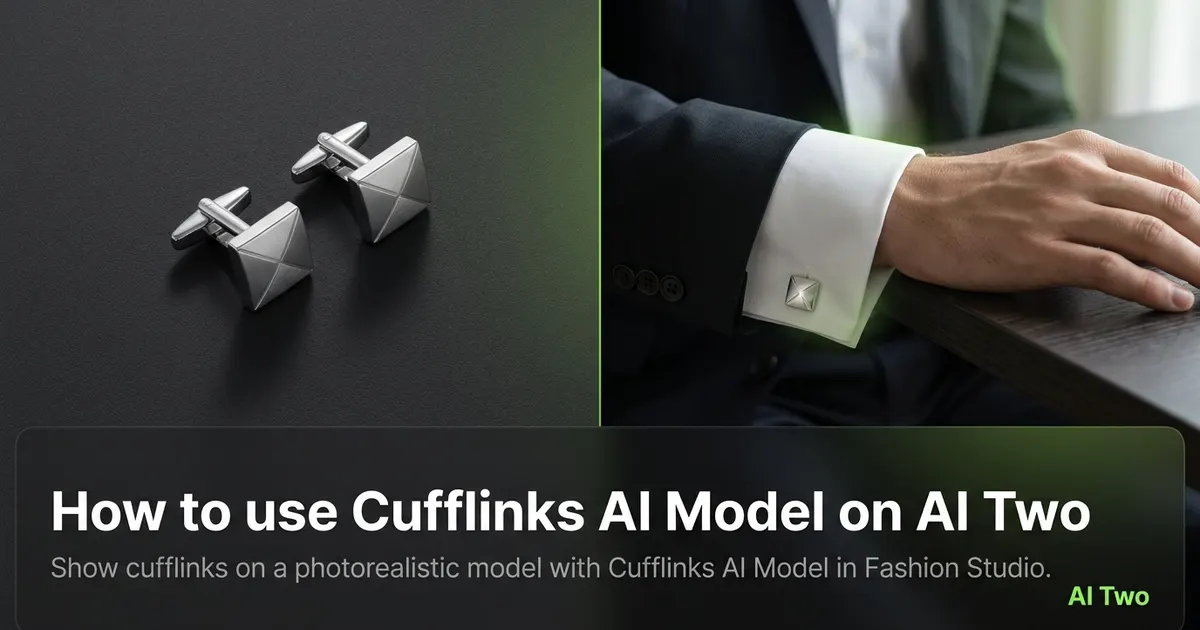
Cufflinks AI Model on AI Two is the Fashion Studio page I open when a formal jewelry SKU needs a worn cuff view for marketplace zoom without booking a model shoot. Jewelry sellers use it to place cufflinks on a photorealistic model with readable metal edge, face detail, and shirt cuff context. When I tested silver knot cufflinks on a clean product photo, the post and face stayed sharp enough for a listing hero, which is the check I use before upload. I treat the download as a seller catalog still, not a consumer try on game, and I rerun only after I compare metal edge sharpness against the flat product photo at the same zoom level.
What Cufflinks AI Model does
Upload a cufflinks product photo or follow the form, choose presentation options, and generate a worn still with the piece on a photorealistic model at the shirt cuff.
When I tested enamel face cufflinks, the output kept edge contrast readable at marketplace zoom without blowing highlights on the metal against fabric.
Fashion Studio lists this beside necklace, choker, anklet, bangle, and watch jewelry model pages in the jewelry cluster.
Built for sellers who need cufflinks on model context for SKU listings, not for consumer try on games.
I open this page after the product photo is dust free and shot on neutral gray. Soft product sources make metal faces mushy on cuff zooms.
Free signup credits covered early SKUs for me. Paid plans raise monthly limits for seasonal jewelry drops.
In my experience, even daylight on metal beats mixed yellow bulbs that flatten silver and gold tone on small faces.
I shoot a macro of the post and toggle back separately when the listing policy allows a detail inset image.
For patterned enamel I place the pair on a gray sweep so the tool reads face contrast without busy packaging.
I name exports by SKU and finish so the marketplace upload folder does not mix gold and silver variants from the same drop.
When a channel asks for a lifestyle crop later, I generate the clean worn hero first, then crop for social after metal sharpness passes review.
How to run it step by step
Step one: sign in or create a free account. Step two: upload a sharp cufflinks photo on neutral background. Step three: pick presentation options, keep defaults on run one. Step four: generate and wait about 30 seconds. Step five: download or adjust one setting and compare.
Keep originals for each SKU. Collections reuse face styles across seasons and metal finishes.
When I tested onyx face cufflinks, I checked post detail at full zoom before I approved the pack.
I run hero SKU first, then batch metal variants once crop and cuff framing are locked.
Credits apply per generation, so I lock one framing on the lead pair before I batch five finishes.
If metal looks flat, I reshoot with softer daylight instead of stacking more runs on a harsh flash photo.
I export the worn still at full zoom checked resolution before I open background remover for white field copies.
When the pair sits close together in the flat photo, I separate them slightly on the sweep first so the tool reads each face clearly.
My second run only changes skin tone or cuff crop after metal sharpness passes. Changing both at once hides which control helped.
I keep a printed measurement note beside the camera so face size notes match the worn still I approve for upload.
Which photo works best
Even daylight or softbox light shows metal edge better than on camera flash alone.
Shoot the pair on gray or white so the face and post are clear. Busy gift boxes hide toggle backs on cuff zooms.
Match the framing on the Fashion Studio before and after card for this tool.
Dust and fingerprints show on silver and gold. Wipe before you shoot.
Avoid heavy beauty filters on product source photos. Buyers zoom, and soft faces get returns.
Include both cufflinks and posts in frame. Cropped toggles hide closure detail shoppers compare on formal jewelry.
Keep camera height natural so the cuff hang looks believable on the model crop the form produces.
Remove plastic hang tags and price stickers before you shoot. They copy into the worn still and look unprofessional on a listing hero.
Shoot at higher resolution when you plan heavy marketplace zoom crops. Soft phone exports fall apart on tiny enamel lines.
Mistakes I avoid
Uploading lifestyle party shots when the listing needs a clean product focused worn cuff frame first.
Changing skin tone, crop, and metal finish together on run one.
Expecting editorial campaign motion from a catalog jewelry tool.
Batching five metal finishes from one blurry phone snap.
Skipping macro sharpness on the face and post. That is where buyers look first on cufflink returns.
Treating the worn still as a size chart. I still list face diameter in the product copy from the flat photo.
When to use another Fashion tool
Need a necklace or choker length? Open Necklace AI Model or Choker Necklace AI Model. Need anklets, bangles, or watches? Open those jewelry model pages in the cluster. Need a white field after the worn shot? Background Remover in post production.
The jewelry cluster guide maps sibling pages. The Fashion Studio pillar covers the wider toolkit.
Open the jewelry hub when you are still choosing which jewelry model form matches the SKU category.
If the piece is a wrist watch rather than cufflinks, switch to the watch form instead of forcing this page.
After the download
I attach the original flat product photo beside the worn still in the SKU folder so merchandising can compare face detail at the same zoom.
For marketplace packs I name files by finish and date so weekend uploads do not mix metal variants.
When a channel asks for a second skin tone, I feed the approved cuff still into a second run instead of restarting from a random crop.
If face engraving softens, I return to the sharpest original and rerun with a smaller presentation nudge rather than stacking fixes on a soft file.
I screenshot the form labels that worked and paste them into the SKU notes so next season matches the approved worn view without guessing.
FAQs
Related studio guides
How to use Jewelry AI Models on AI Two
Place jewelry on fashion models with Jewelry AI Models in Fashion Studio.
Read guide
How to use Anklet AI Jewelry Model on AI Two
Show anklets on a photorealistic model or skin tone preview with Anklet AI Jewelry Model in Fashion Studio.
Read guide
How to use Belly Ring AI Jewelry Model on AI Two
Show belly rings and navel jewelry on a photorealistic model with Belly Ring AI Jewelry Model in Fashion Studio.
Read guide